My name is Lauren, and I’m a Reese’s peanut butter egg-a-holic.
Image may be NSFW.
Clik here to view.
Earlier this month, I received a request from a reader, Deb, to create a healthier version of the highly addictive, seasonal candy that is the Reese’s egg. Knowing there are many low carb eaters out there who face the temptation to hoard these candies every Easter, I was determined to create a healthier alternative. It would be dairy-free, soy-free, and paleo for my primal peeps and allergen-averse readers.
I subsequently raided the friendly neighborhood healthfood store, brought the ingredients into my kitchen laboratory, and got to work on cracking the delectable code for making homemade, nourishing Reese’s eggs. It took 3 attempts to work out the best combination of ingredients for the filling, and a couple of messy kitchen sessions to figure out a good dipping technique.
Peanut butter filling patties, ready to take a dip in chocolate!
Image may be NSFW.
Clik here to view.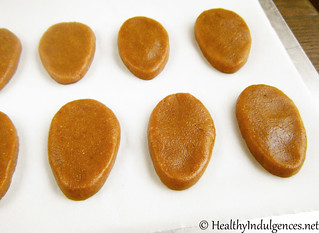
———————-
The toil and trouble was worth it, though. I’m happy to create more tried-and-true, decadent dessert recipes for you all, who have responded so positively to the blog, and the Healthy Indulgences e-cookbook that came out in September. Almost 1,000 copies have been sold! Not having had much time to promote the book due to my busy school/shadowing/volunteer schedule, I was a little worried that the word wouldn’t get out. You guys really came through for me!
A big THANK YOU is in order for everyone on Facebook, Pinterest, and other social media platforms who is sharing the blog, posts and the Amazon Kindle book page. Love seeing those Amazon reviews, too! Image may be NSFW.
Clik here to view.![]() To express my gratitude, there’s gonna be another NuNaturals stevia GIVEAWAY in this post! Scroll down for the details on how to enter…
To express my gratitude, there’s gonna be another NuNaturals stevia GIVEAWAY in this post! Scroll down for the details on how to enter…
———————-
To see whether the final product was up to par, I delivered one of the homemade eggs ceremoniously to my Official Taste Tasters. My sister and brother-in-law tasted the faux Reese’s egg alongside the real deal. As they bit into the candies, I anxiously awaited their response.
What was the verdict?
The homemade PB chocolate egg was a hit! By comparison, the real Reese’s egg was sickly sweet, leaving a “tingling, almost burning sensation” in the back of the throat due to its intense sweetness. The homemade knock-off Reese’s eggs were a tremendous success!!!
Hope you all enjoy these paleo diet-friendly, dairy-free, and soy-free treats for many Easters to come. They’re perfect any time of year, actually. You can make them sugar-free using a combination of powdered erythritol and stevia, or Truvia, but I haven’t had the chance to try that version yet.
Shopping Tip: There is now a more reasonably priced source for the 1 ounce bottle of NuNaturals pure stevia extract powder at Amazon.com. It’s a dollar cheaper than iherb.com, with free shipping!
Image may be NSFW.
Clik here to view.
Coconut butter is the star ingredient in this recipe, acting as a replacement for the cream cheese used in these Healthier Chocolate Peanut Butter Buckeyes. Combined with cashew butter, it contributes to the creamy consistency and richness of the peanut butter filling. Just FYI for you coconut haters: The coconut flavor is not noticeable in this recipe, as it’s over powered by peanuttiness. Image may be NSFW.
Clik here to view.![]()
The product used in the candies you see above was Nutiva coconut manna. I picked it up from Mother Earth Natural Foods here in Florida for $10.49. Coconut butter requires some stirring before use so that the upper layer of coconut oil is distributed throughout the product. Just remove the lid from the jar and nuke it for a few seconds if it’s too firm to get a spoon in.
Healthier Peanut Butter Chocolate Easter Eggs (Paleo, Gluten-Free, Dairy-Free, Soy-Free)
Makes a big batch of peanut butter eggs!
Ingredients:
1 cup natural peanut butter
2 Tablespoons coconut butter (also called coconut cream concentrate)
2 Tablespoons cashew butter
10 teaspoons honey OR 1/4 cup coconut palm sugar*
1/8 teaspoon good tasting pure stevia extract
4 teaspoons coconut flour (if you use honey)**
1 batch of sugar-free “milk” chocolate bark
*Powdered erythritol or xylitol would work well, too. You might want to replace a couple teaspoons of it with honey to make the filling sweeter and easier to work with.
**If you use coconut palm sugar or another granular sweetener, you might not need coconut flour to thicken the filling.
Preparation:
Grind the sweetener along with sea salt in a Magic Bullet blender or coffee grinder (see my e-cookbook or this post for a tutorial!). Stir together the peanut butter, softened coconut butter, and cashew butter. If you use a glass bowl, it’s easier to gently heat the filling in the microwave for a few seconds to melt any lumps of coconut butter. Work in the honey or powdered sweetener, stevia, and sea salt mixture with a spatula until there are no white streaks. Sift in the coconut flour, working it in with a spatula until the filling is smooth.
If the filling “dough” is too runny to hold its shape, chill it for a few minutes in the refrigerator. If you’d like to assemble the candies at a later date, wrap the filling in plastic wrap, and store it in the fridge.
Line a small toaster pan or cookie sheet with parchment or wax paper. Drop teaspoon-sized balls of dough on to the parchment, molding them into egg shapes using clean finger tips. Chill the pan with the molded filling in the freezer. Line another small pan with wax paper, and stick it in the freezer to chill until you are ready to assemble the candies.
To make a fast and easy chocolate coating for the candies, use a Lindt 70% or 85% bar. The 85% bar is intensely dark, but it has significantly fewer carbs. The 70% bar is more appropriate for a conventionally sweet coating, although it doesn’t come close to the sweetness of Reese’s milk chocolate. My homemade, sugar-free “milk” chocolate recipe is much more Reese’s like, and SO yummy. Not to toot my own horn, but I’d eat it or dairy-laden chocolate any day. Image may be NSFW.
Clik here to view.![]()
If you’re using a Lindt 70% bar, break it up into pieces in a microwave-safe bowl. Melt the chocolate in 20 second intervals, stirring until liquified. You can add a teaspoon of organic, nonhydrogenated shortening to make the coating less prone to cracking once it has cooled off.
If you are using the dairy-free “milk” chocolate coating, follow the listed directions. Just leave out the candies, nuts, etc. The fabulous taste of this recipe makes the hassle of ordering cocoa butter SO WORTH IT! You’ll never want to make candy without cocoa butter again. It’s a fabulous ingredient that makes the candy the melt in your mouth, not in your hand.
Once the chocolate coating has melted, set it aside. Remove the chilled tray of filling pieces, and second chilled pan lined with wax paper, from the freezer. Working quickly, dropped the chilled pieces of filling into the coating, and turn ‘em over in the chocolate couple times. Use a couple of forks for the job. Let the excess chocolate drip off a bit. Then, slide the candies carefully on to the second chilled pan.
Stick the coated candies into the freezer to quickly set them. If you’re going to dip them a second time like I did, just repeat the process. You can keep your finished chocolate PB eggs at room temperature for a couple of days. They’ll keep for longer in the fridge.
———————-
GIVEAWAY RULES:
Four winners will win prize packages consisting of two (2) bottles of orange- and lemon-flavored stevia from NuNaturals. You’ll get to try one of each flavor! The winner will have to provide their address to receive their prize package, shipped from the company. To enter, share this post on Facebook, repin it on Pinterest, or Tweet about it. You’ll receive one entry for each share! Comment with a link to each of your shares, and leave your email address (spaced out like this –>healthyindulgences @ gmail . com<– to prevent spambots!).